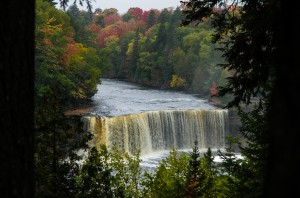
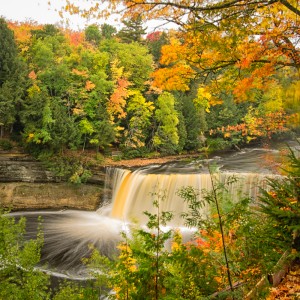
The previous post was of Living Waters - my fall foliage photo of the upper falls at Tahquamenon Falls State Park. Since publishing that image, some have asked how it was made, and specifically how the “veil” was captured on the water.
In a general way, when you see a photograph where there is moving water (such as a waterfall or a cascading stream) that looks silky and smooth, something has been done to avoid the camera’s shutter speed stopping the water flow. That is, most cameras, on various auto modes, will choose a shutter speed in daylight that is fast enough to stop the water, as seen in the top image at right. This was a test image I took at a different location in the park, prior to taking Living Waters, where the shutter speed was 1/40 of a second (barely fast enough to stop the water flow).
By observing images created by others, and by experimenting myself, I have found that a slightly longer exposure (slower shutter speed) will create that silky look to water. How much time the shutter needs to be open depends on the surrounding light and the exact effect you want to achieve.
I have found that shutter speeds from around 1/3 of a second to a few seconds (usually 3 to 5 seconds) will give a very pleasing, soft, look to the waterfall. For example, the recent image of Walker Falls was shot with the shutter open 1.3 seconds (the odd time was me guessing about a second).
For Living Waters I tried several things to get different looks. I tried it at about 3 seconds, then 8 seconds, and finally 15 seconds. The shots at 3 and 8 seconds were nice, with beautiful silky falls. However, in both of those the “veil” in the water below the falls was not fully formed. It was only in the longest exposure, 15 seconds, that the veil really looked good.
But wait! How do you keep the shutter open for that long? I know. You can choose your lowest ISO setting, and a high f-stop, but sometimes, even with that, you can’t keep the shutter open long enough to get these effects. Besides, if you saw my posts on social media, you’ll notice that Living Waters was shot at ISO 100 and f/9. That was about the same as the test shot at 1/125 sec.
The secret sauce is in finding a way to reduce the amount of light coming into the camera lens without altering the color or sharpness of the image. One way to do this is to use a circular polarizing filter (CPL) on your lens. This will typically reduce the exposure by two stops. That is, if your shutter would have been 1/125 sec. without the filter (typical for many daylight shots), it will be about 1/30 sec. with the filter.
But it is a different matter to slow it down even more, without changing the ISO or the f/stop. Why I might want to keep the ISO and f/stop is a matter for another post. For now, assume that I do want that.
To go farther, we enter the world of neutral density (ND) filters. As part of his “Ultimate Guide to Long Exposure Photography - 2014 Edition”, professional fine art photographer Joel Tjintjelaar has (near the end) a discussion of ND filters. In short, they are neutral in that they do not alter the image, but their density darkens the subject (reduces the amount of light), so that a longer shutter speed will allow movement (in our case, of the water) to be captured for a longer period of time. These filters come in various densities, usually 3 stops, 6 stops, and 10 stops, and, due to people wanting to combine filters to get an even longer exposure, Formatt-Hitech has recently released a 16-stop ND filter.
For Living Waters I added a 6-stop ND filter (made by B+W) to slow my shutter speed to 15 seconds.
In post-processing, I used Lightroom 5 to adjust the whites and blacks and add a bit of contrast, which is nearly always needed with digital images. I also used a Lightroom plugin from Google’s Nik Software, Color Efex Pro 4, to bring out the colors a bit more, then finished with a bit of sharpening and a square crop.
I hope you enjoy it!